At Energy Wise, we specialise in providing affordable energy-saving solutions. In this guide, we will explore the concept of solar cooking, specifically focusing on the use of the new Energy Wise Solar Cooker.
What is Solar Cooking?
Solar cooking is a method of cooking that uses sunlight as the primary source of fuel. A solar oven or cooker is a device that uses sunlight to cook food & it’s a great way to get outside & cook! What is it about outdoor cooking that we all love? Is it the fresh air? Is it the feeling of adventure? Is it the primordial memory of our pre-historic roots? Whatever the reason, cooking outdoors is fun & festive.
The benefit of solar cooking is that you are not dependant on any other types of fuel. So, whilst the sun is shining, you will not need to use your electricity, gas, firewood, charcoal, or butane. Save all of those for nights & cloudy days! Want to be environmentally friendly or ‘Energy Wise’? (as we like to call it!), well since there is no smoke, solar cooking does not contribute to the pollution of the atmosphere! & because there is no fire, solar cookers can be used in ‘no burn’ areas & on ‘no burn’ days.
How long does it take to cook in a solar cooker?
Solar cooking is much more like a slow cooker than a regular oven. To solar cook, one needs to plan ahead & have patience as there are many variables to consider. Luckily, we have put together this guide to help you get started!
How does a solar oven work?
Solar cooking is much more like a slow cooker than a regular oven. To solar cook, one needs to plan ahead & have patience as there are many variables to consider. Luckily, we have put together this guide to help you get started!
Solar cookers convert the energy from the sun into heat. Therefore, in order to cook, there must be sunshine! To achieve the best results, i.e the hottest temperatures & the fastest cooking times, keep the solar cooker focused into the sun at all times, with very few or no shadows inside the cooker. To focus the cooker, stand behind it & aim it directly into the sun so that the shadow falls directly behind it. Refocus the cooker as often as necessary to keep it focused directly into the sun.
Setting Up Your Solar Oven
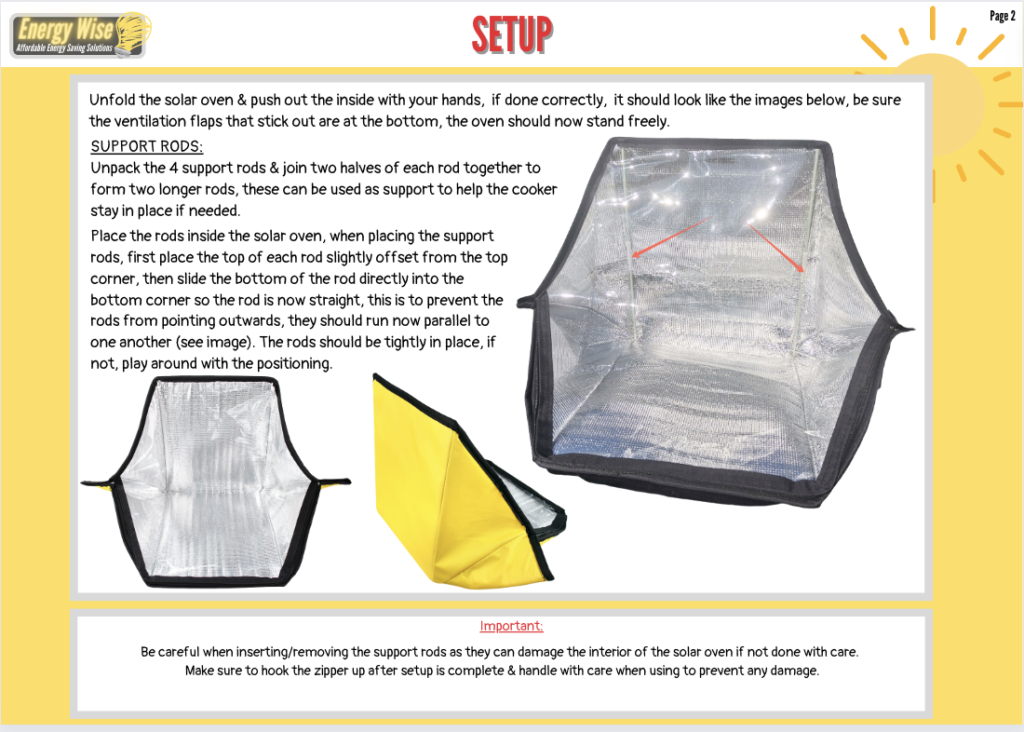
The first step to using your solar cooker is setting it up correctly. Unfold the solar oven & push out the inside with your hands, if done correctly, it should look like the images below, be sure the ventilation flaps that stick out are at the bottom, the oven should now stand freely.
Next, you’ll need to set up the support rods. Unpack the 4 support rods & join two halves of each rod together to form two longer rods, these can be used as support to help the cooker stay in place if needed.
To use the rods, Place the rods inside the solar oven, when placing the support rods, first place the top of each rod slightly offset from the top corner, then slide the bottom of the rod directly into the bottom corner so the rod is now straight, this is to prevent the rods from pointing outwards, they should run now parallel to one another (see image). The rods should be tightly in place, if not, play around with the positioning.
Be careful when inserting/removing the support rods as they can damage the interior of the solar oven if not done with care. Make sure to hook the zipper up after setup is complete & handle with care when using to prevent any damage.
Preheating and Focusing Your Solar Oven
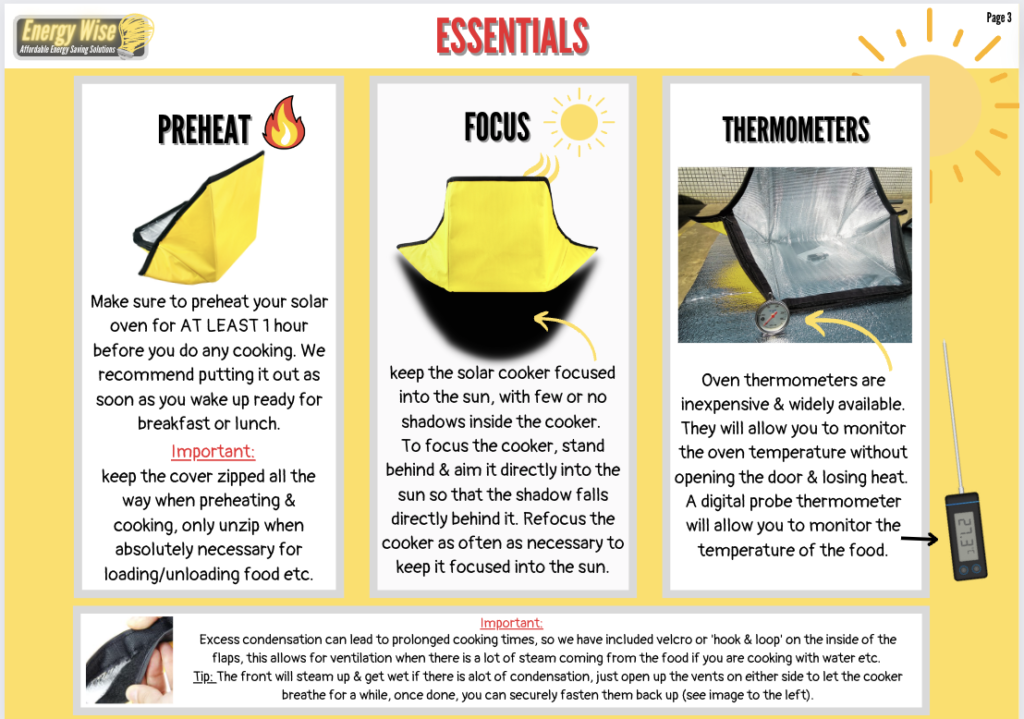
Before you start cooking, it’s important to preheat your solar oven for AT LEAST 1 hour. We recommend putting it out as soon as you wake up ready for breakfast or lunch. Keep the cover zipped all the way when preheating & cooking, only unzip when absolutely necessary for loading/unloading food etc.
To maximize your cooking efficiency, always keep the solar cooker focused into the sun, with few or no shadows inside the cooker. To focus the cooker, stand behind & aim it directly into the sun so that the shadow falls directly behind it. Refocus the cooker as often as necessary to keep it focused into the sun.
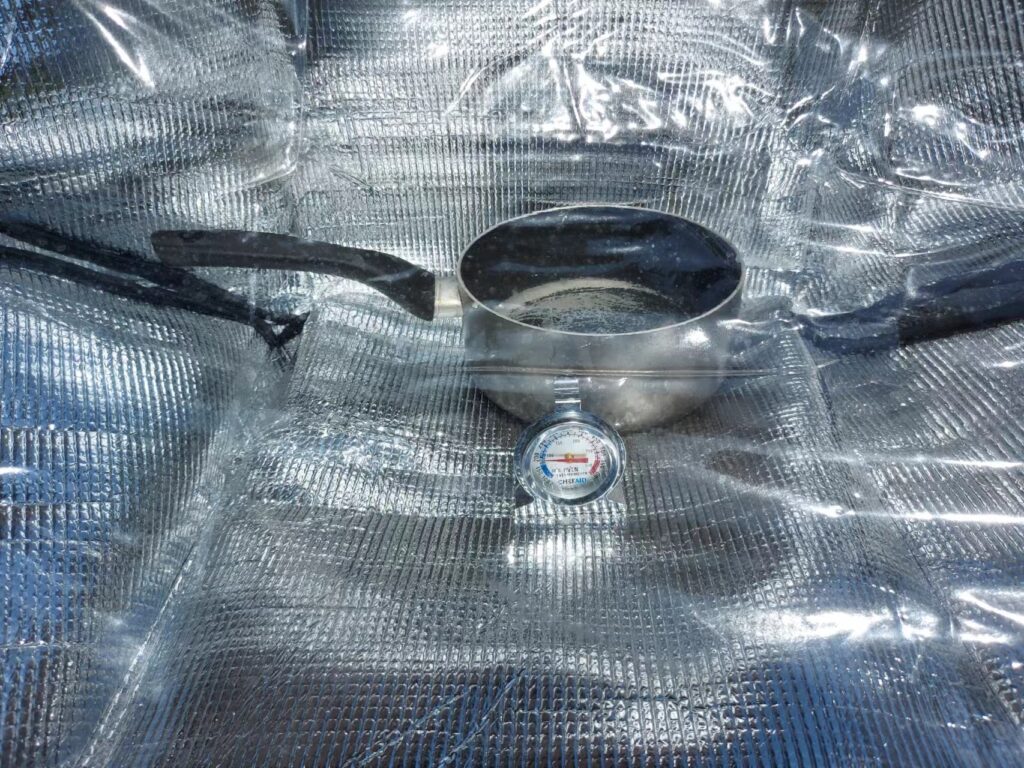
Monitoring Your Cooking
Oven thermometers are inexpensive & widely available. They will allow you to monitor the oven temperature without opening the door & losing heat. A digital probe thermometer will allow you to monitor the temperature of the food. Remember, excess condensation can lead to prolonged cooking times, so we have included velcro or ‘hook & loop’ on the inside of the flaps, this allows for ventilation when there is a lot of steam coming from the food if you are cooking with water etc.
Recommended Equipment
When it comes to solar cooking, the type of equipment you use can greatly affect the outcome. Here are some recommendations:
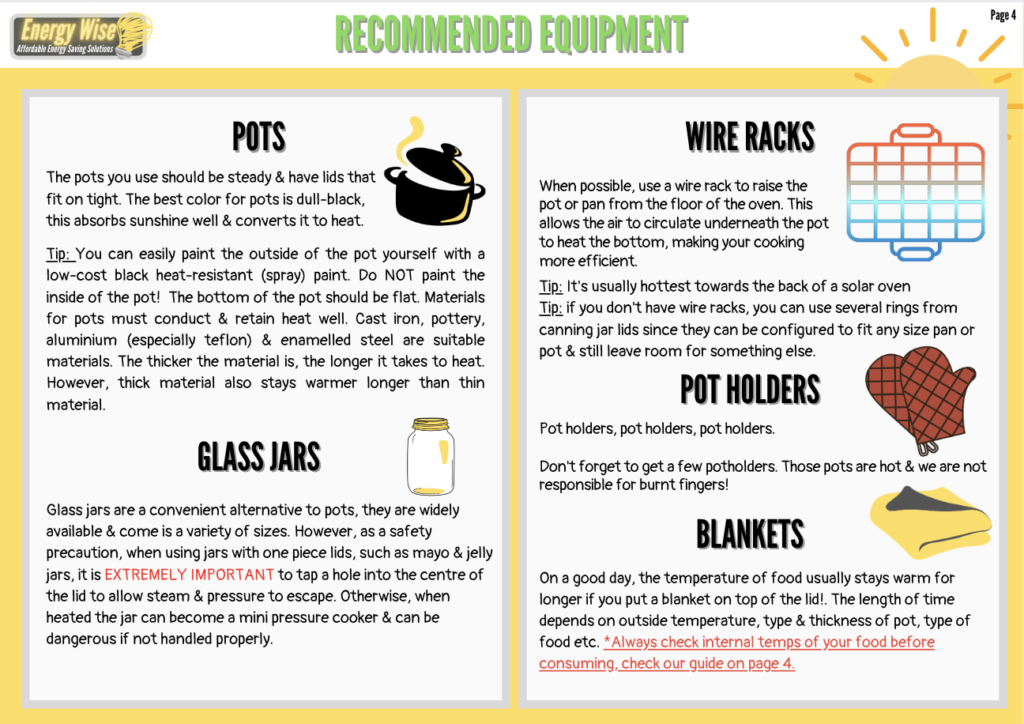
Pots: The pots you use should be steady & have lids that fit on tight. The best color for pots is dull-black, this absorbs sunshine well & converts it to heat. Materials for pots must conduct & retain heat well. Cast iron, pottery, aluminium (especially Teflon) & enamelled steel are suitable materials. The thicker the material is, the longer it takes to heat. However, thick material also stays warmer longer than thin material.
Glass Jars: Glass jars are a convenient alternative to pots, they are widely available & come is a variety of sizes. However, as a safety precaution, when using jars with one-piece lids, such as mayo & jelly jars, it is EXTREMELY IMPORTANT to tap a hole into the center of the lid to allow steam & pressure to escape. Otherwise, when heated the jar can become a mini pressure cooker & can be dangerous if not handled properly.
Wire Racks: When possible, use a wire rack to raise the pot or pan from the floor of the oven. This allows the air to circulate underneath the pot to heat the bottom, making your cooking more efficient. If you don’t have wire racks, you can use several rings from canning jar lids since they can be configured to fit any size pan or pot & still leave room for something else.
Pot Holders/Gloves: Don’t forget to get a few pot holders. Those pots are hot & we are not responsible for burnt fingers!
Blankets: On a good day, the temperature of food usually stays warm for longer if you put a blanket on top of the lid! The length of time depends on the outside temperature, type & thickness of pot, type of food etc.
Cooking Times and Temps
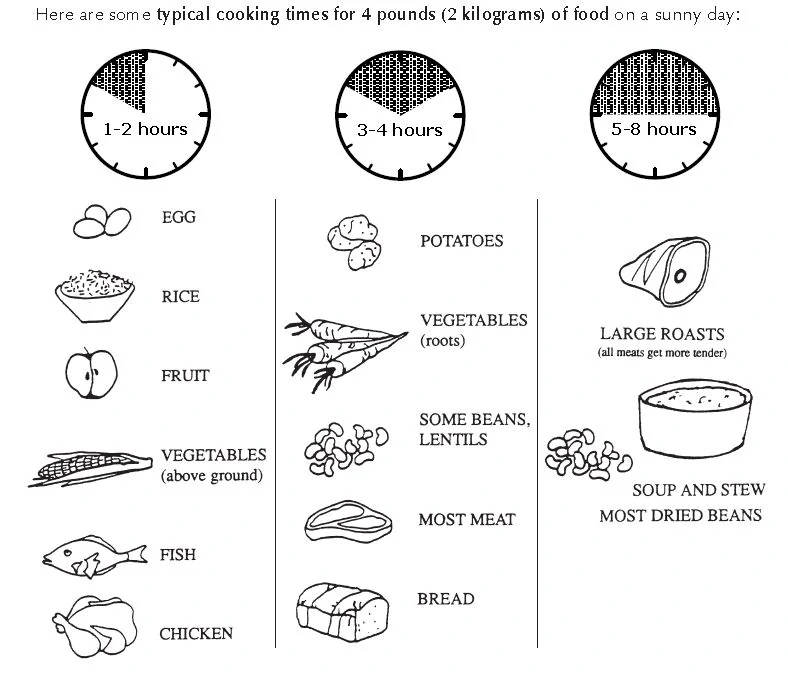
Times vary according to the amount/type of food, the outside temperature, the kind of cooking pot & the position of the cooker. It is difficult to give exact cooking times, however, it’s hard to overcook food in a solar cooker, so you can safely leave it unattended for much longer than the minimum cooking times. Cooking times can be roughly divided into three categories:
Easy-to-cook foods – 1-3 hours; these include fish, chicken, eggs, vegetables, fruits, rice & pasta.
Medium-cooking foods – 3-5 hours; these include potatoes, roots, most meats (especially small pieces), seeds, lentils, bread & pastries.
Slow-cooking foods – 5-8 hours; these include big amounts of food, large roasts; soup & stew; casserole; & most dried beans.
Heating water also takes a long time, especially large amounts. If you are a beginner, we recommend trying our beginner-friendly recipes below.
On a good day, the temperature inside the cooker should rise relatively quickly to 100° C (210 F), which is high enough for cooking most foods as long as enough cooking time has been allocated! HOWEVER, we do NOT suggest trying to cook or reheat meat in this cooker UNTIL you are experienced, then you can do so at your own risk.
If you do want to cook meat, please take a look at our rough cooking temps guide below for food you must keep an eye on, but don’t fear…we have included beginner-friendly recipes to get you started:
- Poultry – 165°F (75°C)
- Poultry, ground – 165°F (75°C)
- Beef, ground – 160°F (70°C)
- Beef, steak or roast – 150°F (65°C)
- Lamb, ground – 160°F (70°C)
- Lamb, chops – 150°F (65°C)
- Pork – 150°F (65°C)
- Ham – 150°F (65°C)
- Ham, precooked & reheated – 165°F (75°C)
Note: Food in a solar oven usually takes about 2-4x as long to cook as in a regular oven! Always Allow plenty of time & ensure there will be enough sunshine for successful solar cooking. Remember to ALWAYS check food temps with an internal probe before consuming.
Tips & Tricks for Successful Solar Cooking
- In general, there is enough sun to cook if you can see a dark shadow. A few clouds overhead are acceptable, but the darker the shadow is, the better the cooking will be.
- Although the best cooking hours are usually between 11am-4pm , conditions such as the weather, the location of trees & buildings, & your local climate will dictate your best hours., trial & error works best for this as everyones circumstances are different.
- Place the cooker in a protected area, away from the wind, to help keep the oven operating at it’s hottest. We recommend putting the cooker out to preheat for at least an hour before attempting to cook anything, you can put it out in the morning when you wake ready for breakfast or lunch.
- Times vary according to the outside temperature, amount of food, the kind of cooking pot you are using & the position of the cooker. It’s difficult to give exact cooking times. However, it’s also hard to overcook food in a solar box cooker like ours, so you can safely leave it unattended for much longer than the minimum cooking times. Please check our cooking times guide on page 4.
- You should use water as usual when cooking swelling foods such as beans, rice & porridge. Do not use any water for meat, fish, eggs, vegetables or to heat foods up.
- It is advisable to put the food in pots so that you do not need to stir it. However, if you must stir, do it quickly, only a few times & not before the food is hot. Make sure to close the lids of the pots & the cooker’s zipper lid carefully. If possible, use pots with tight fitting lids, because otherwise steam from the food covers the inside the cooker, & this slows down cooking. If this happens, you can always use the ventilation method we spoke about on page 2.
- On a good day, the temperature inside the cooker rises quickly to 100° C (210 F), which is high enough for cooking most foods as long as enough cooking time has been allocated. Please check our cooking times/temps guide on page 4. However, we do NOT suggest trying to cook or reheat meat in this cooker UNTIL you are experienced, then you can do so at your own risk.
- On a good day, the temperature of cooked food (removed from oven) should stay higher for longer if you put a blanket over the top of the lid.
- It is not advisable to store or eat meat dishes below 150°F/ 65 °C, because after this point the reproduction of microbes is high & the risk of food poisoning increases. Always check internal temperature with a probe before consuming. Check our guide on page 4.
- Food is safe inside the cooker from rubbish, insects & animals (providing the ventilation flaps are closed & it’s zipped all the way), but do not store it there overnight because of the microbe risk.
- Always wipe down the cooker after every use to avoid a build up of microbes. The reflective surfaces lose their effectiveness if they become broken or are covered by dust or dirt. Wipe any dust or dirt off & repair any rips or tears immediately. Taking good care of the cooker increases its lifetime & effectiveness.
What to Cook? (DIY Solar Oven recipes)
Now that you have the basics down, it’s time to explore some beginner-friendly recipes using the Energy Wise Solar Oven, as promised, here is 8 solar cooking recipes to get you started:
Solar Pizza: Soft rolls cut in half, pizza sauce, mozzarella cheese, pepperoni.
Preheat the oven. Cut the rolls in half. Spoon sauce onto the roll. Top with cheese & pepperoni. Place the pizza inside the oven (use racks to improve airflow). The cooking time will be relatively short, because the sauce only needs to be warmed up & the cheese melted.
Solar Grilled Cheese: 2 slices of firm bread, 1 TBSP of butter or margarine, Cheese.
Preheat the oven & pan. Butter one side of the first slice of bread & place face down on a hot pan. Place cheese on the other side, Butter one side of the second slice of bread. Place the bread, butter side up, on the cheese. Grill the first side, until golden brown.. Flip the sandwich & grill the other side, grill until both buttered sides are golden brown.
Solar Nachos: 1 sharing bag of corn chips, 1/4 pound of cheddar cheese (grated), Salsa, Sour cream, Guacamole. Optional: Sliced Jalapeno pepper.
Preheat the oven. Place half a bag of chips on a tray. Layer sour cream, salsa & grated cheese over the top of the chips, then repeat the process with the other half. Place in the solar cooker & remove when warmed or until cheese has melted.
Solar Garlic Bread: Thick bread of your choice, 1 cup of soft butter/margarine, 2 TBSP of powdered garlic spread, 4 oz of shredded Cheddar & Monterrey Jack cheese blend.
Note: You can use regular garlic butter instead of butter + powder.
Preheat the solar oven. If not sliced, use a serrated knife to slice the bread into thick slices. In a small bowl, mix the soft butter & garlic spread seasoning. Mix well to blend. Spread butter on each slice of bread. Insert a small amount of the cheese on each slice of bread. Place in the oven (use racks to improve airflow). Cook until the bread is hot & the cheese is melted.
Solar (Chilli) Dogs: Hot dogs (quick cook/jar warm up style), buns, Pre-made chilli or a can from the store will do, shredded cheese, Optional: chopped onions, red pepper etc.
Preheat the oven. (Use racks to improve air flow) If you don’t have racks, you can wrap the hot dogs in aluminium foil, shiny side in, or just place them in a covered pot to steam. Put chilli in a covered pot to heat. Heat until sausages & chilli are cooked through*. Fix up the chilli dogs the way you like them.
*Always check internal temps of your food before consuming, check our guide that comes with purchase!
Instant Solar Noodles: Preheat the oven. Leave water to heat in the oven until hot (the more water you heat, the longer this will take). Once hot (does not have to be boiling), place the noodles in the pan & cover, cook until soft or to your liking, drain & mix with seasoning sachet. Make sure to drain before you add the sachet, as you will loose the flavour if it’s mixed with too much water.
Solar Beans w/ Bread: 1 large can of baked beans, 1/2 cup of brown sugar, 1/4 cup of Worcestershire sauce (or brown sauce), 1/4 cup of mustard.
Preheat the oven. Combine ingredients & mix well. Place in a dark pot. Cover & bake until heated. Pour over a bread of your choice, we recommend buttered tiger bread!
Solar Brownies: 2 cups of white sugar, 1 cup of butter or margarine, 1/2 cup cocoa powder, 1 teaspoon of vanilla extract, 4 eggs, 1 1/2 cups of all-purpose flour, 1/2 teaspoon of baking powder, 1/2 teaspoon of salt, 1/2 cup of walnut or pecan pieces (optional).
Preheat the oven. Melt the butter or margarine in the solar oven. When melted, add the other ingredients & mix well. Bake until the mix solidifies. (Be sure your brownie pan fits in your oven, otherwise, you may need to adjust this recipe for the size of your pan).
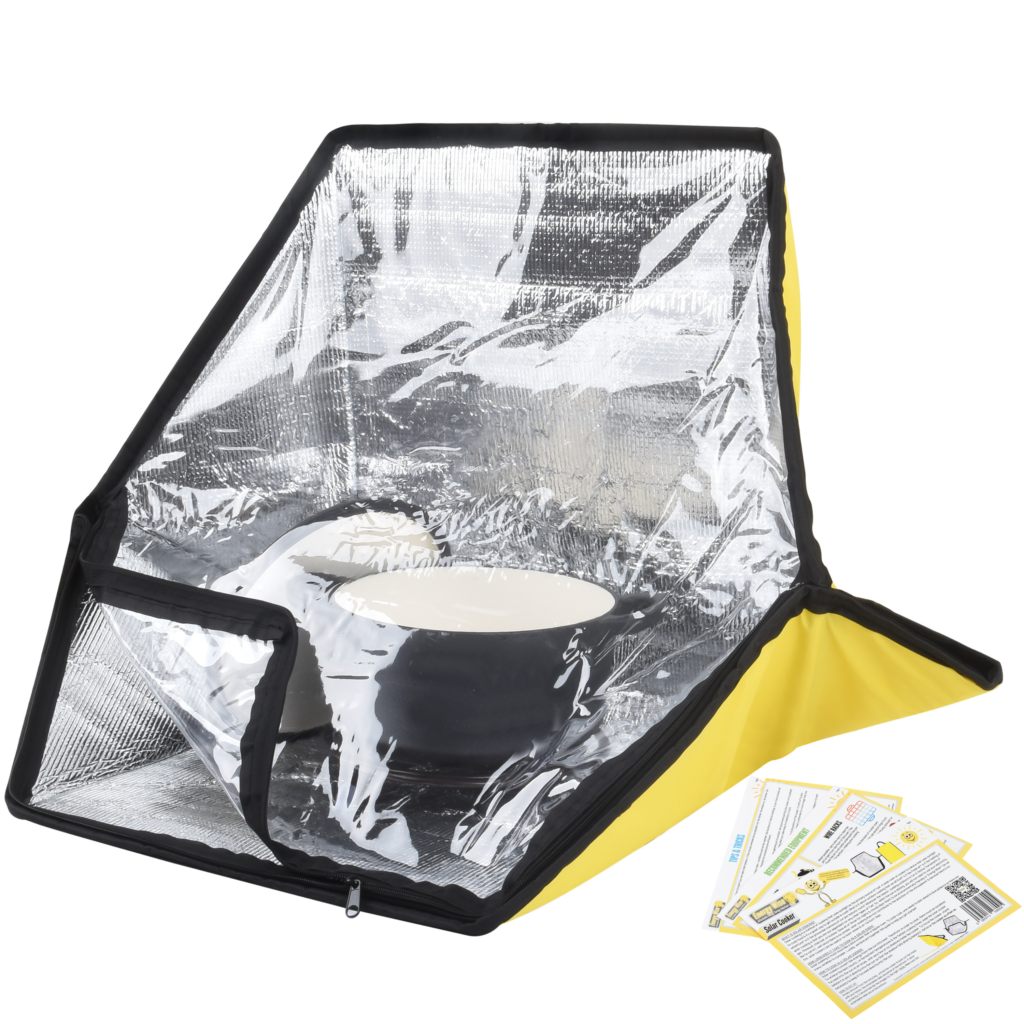
And more…Be sure to check out the Energy Wise Solar Oven if you are in the market for an effective yet affordable solar oven, it comes with a full guide including everything in this article complete with beginner friendly recipes! See below for more information:
Some of the features include:
- ✅ Support Rods Included: 2x support rods are included to provide extra support/stability & prevent sagging (if needed).
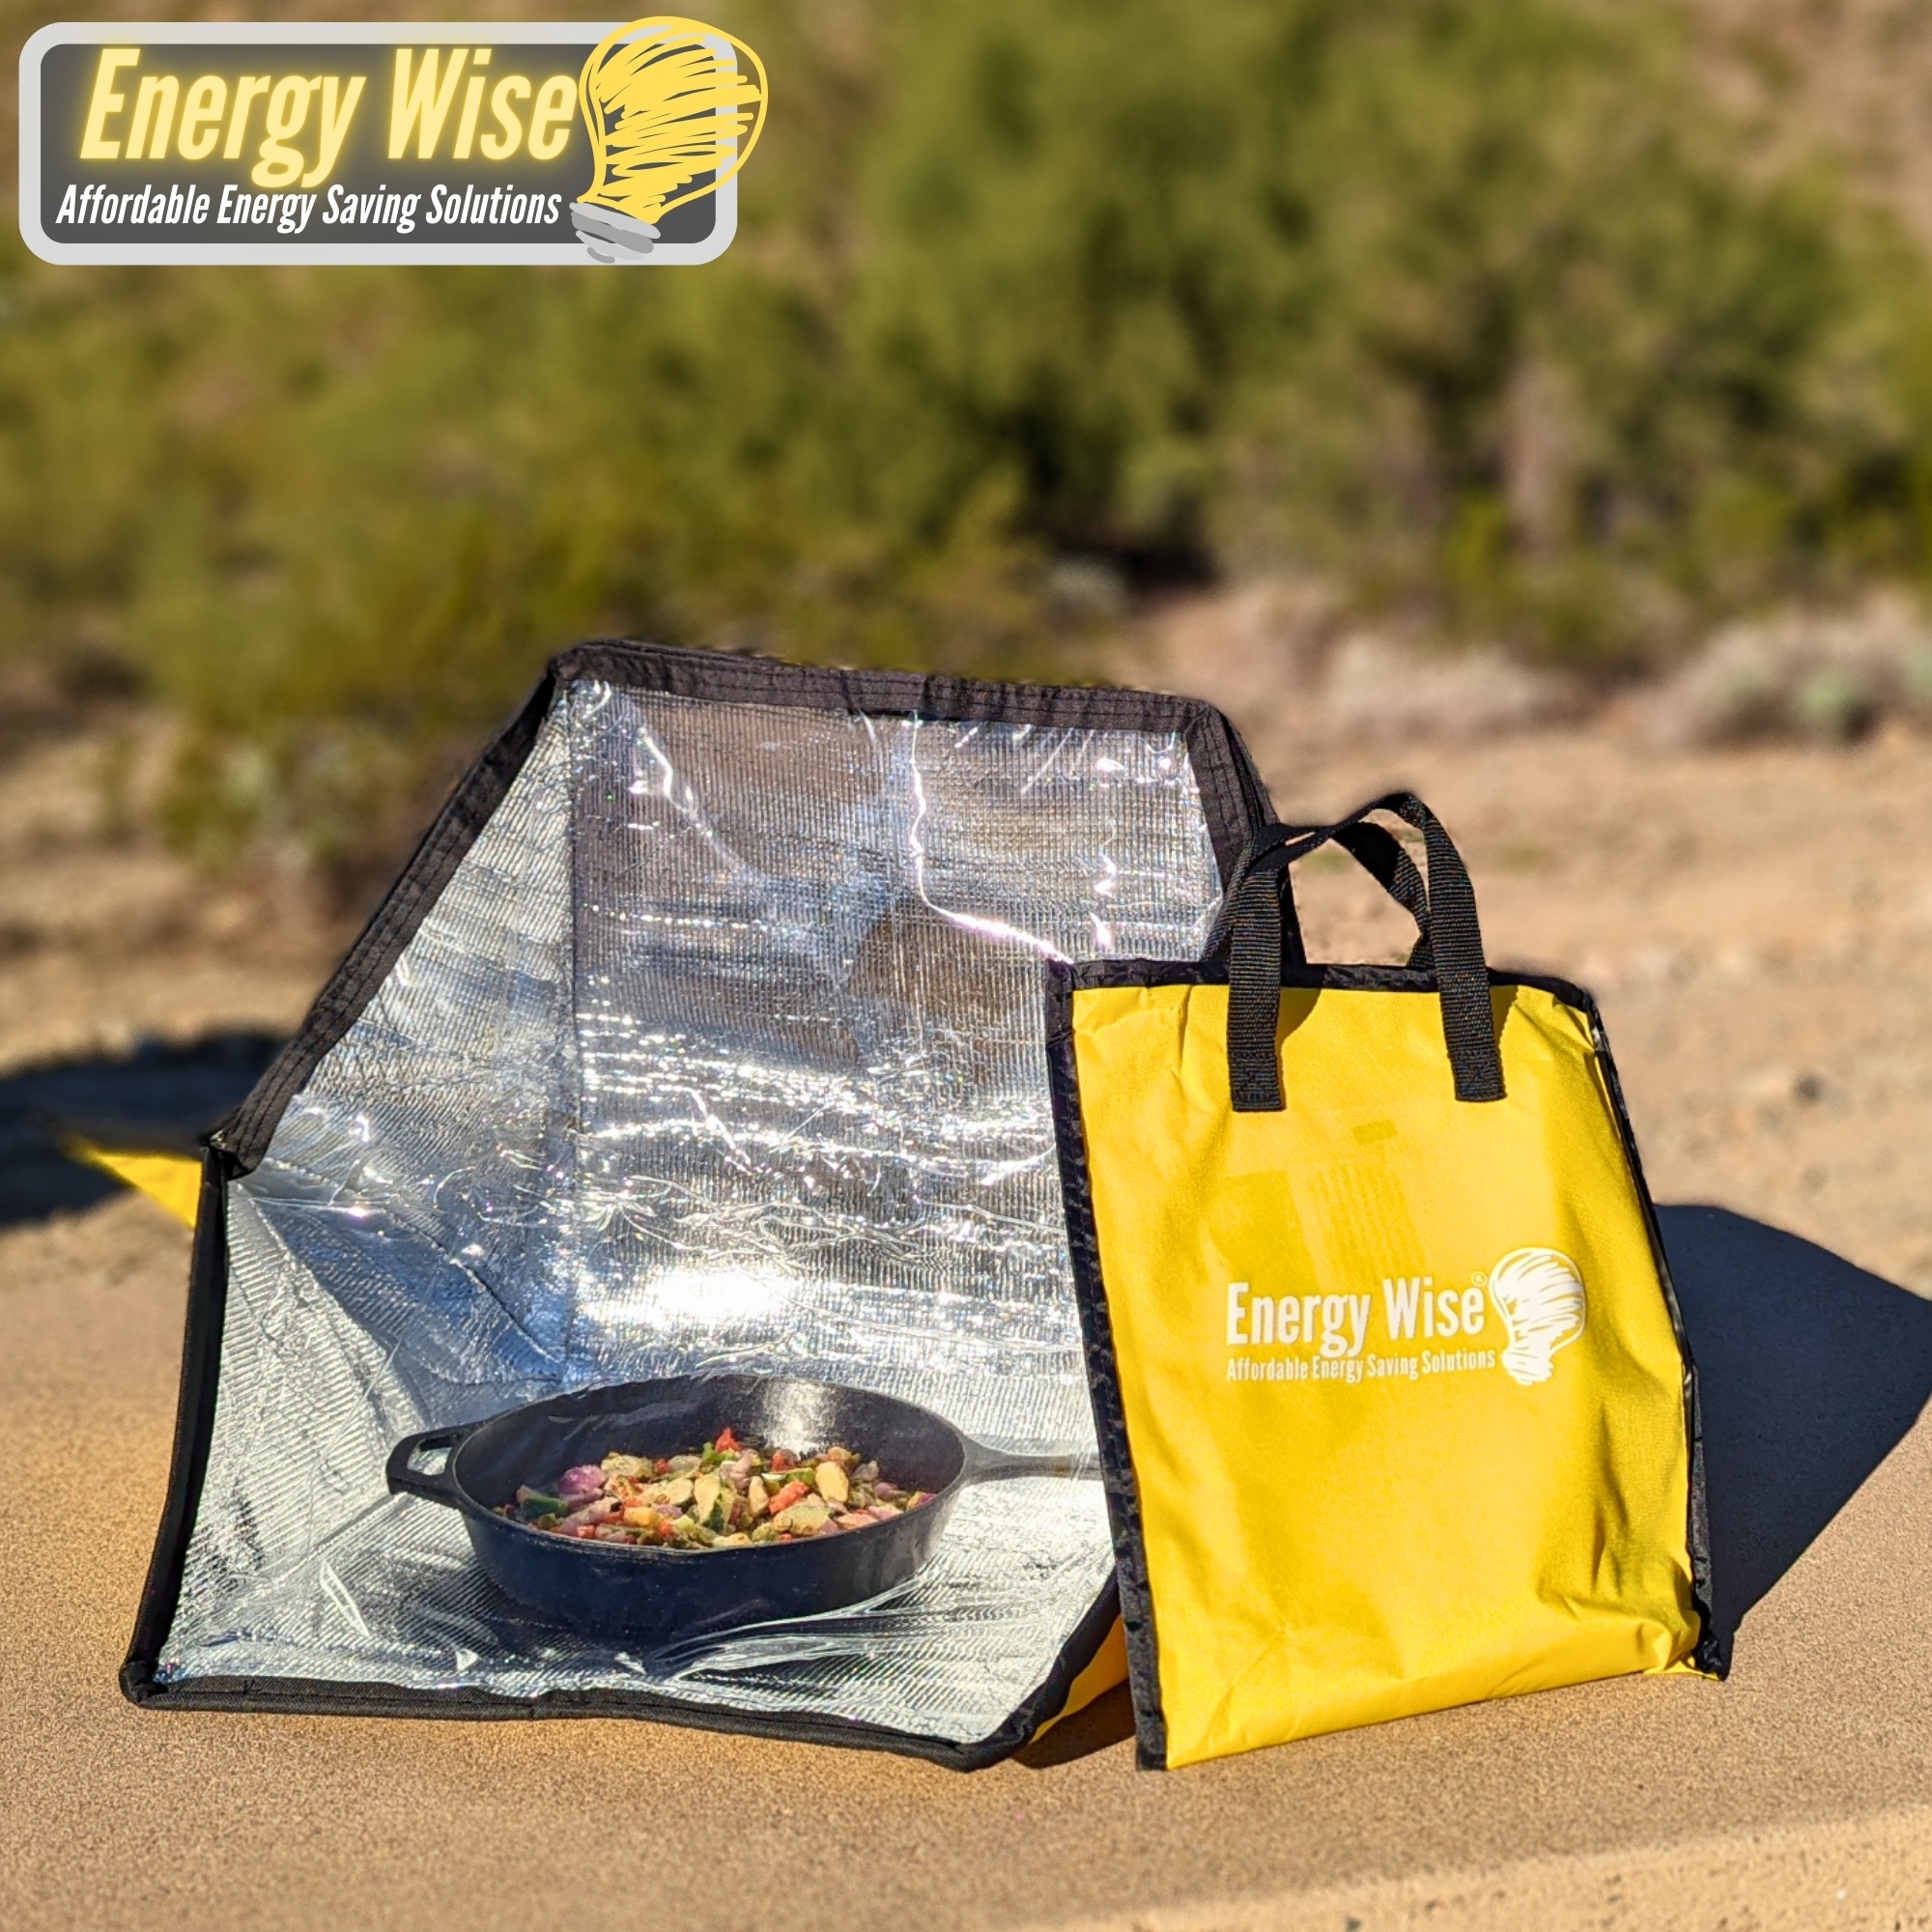
- ✅ Sturdy & Portable: Our solar oven is foldable & comes with a carry case, simply remove from the bag & unfold! The solar oven will expand into shape & stay put thanks to its reinforced design.
- ✅ Large interior: Fit enough cookware inside our portable cooker to feed a whole family or a group of friends! We’ve even included some recipes to get you started!
- ✅ Cook a Variety of Foods On the Go: Our outdoor oven can reach up to 212F (100C) in the right conditions, cook many types of food or even use it as a solar water heater.
- ✅ Reinforced: Featuring reinforced EPE foam inside reflective metal, a transparent PVC lid & zippers to keep heat in, hook & loop sides for ventilation when needed & a yellow oxford cloth finish on the outside.
- ✅ Free Outdoor Cooking Guide Included: Receive a printed guide on the fundamentals of solar cooking & how to use your camping oven correctly, comes complete with beginner friendly solar oven recipes!
Energy Wise Solar Oven, Portable, Reinforced & Foldable, Comes with 2x Support Rods, Carry Bag & Full Outdoor Cooking Guide
✅ Support Rods Included: 2x support rods are included to provide extra support/stability & prevent sagging (if needed). ✅ Sturdy & Portable: Our solar oven is foldable & comes with a carry case, simply remove from the bag & unfold! The solar oven will expand into shape & stay put thanks to its reinforced…
Remember, solar cooking takes practice & trial & error, because of the nature of the craft (relying on the sun) things don’t always go as planned. That’s why we’ve selected a few easy-to-follow recipes to start you off, all our recipes below are safe & beginner-friendly! Lastly, make sure to have fun whilst using our solar cooker!
For any queries or help, feel free to email us at sales@energywisebrand.com or visit our website at energywisebrand.com.
Links to external resources: